How To Build A Webull Custom Layout (2026 Edition)
A step-by-step 2026 walkthrough on building a fully customized Webull desktop layout — charts, watchlists, news, order entry, and more.

Webull's desktop platform has come a long way over the past couple of years, and the customized layout feature has gotten a lot more powerful. Whether you're a brand-new Webull user or just looking to clean up your existing setup, this updated 2026 walkthrough will take you through the process step by step. By the end, you'll have a layout that's tailored exactly to how you trade — charts, watchlists, news, order entry, and more, all in one place.
Why Build a Custom Layout?
Webull comes with a handful of pre-built layouts — day trading, multi-charts, option scanning, event contracts, futures, and a few others. They're not bad starting points, but they're built for a generic trader, not for you. The whole point of the customized layout feature is to set up Webull exactly how you use it, with the widgets you need in the spots that make sense to you.
For this walkthrough, I'm building a charting and analysis layout — somewhere I can chart stocks, manage my watchlist, glance at the news, and place a trade if I need to. You can apply the same process to build any kind of layout — active day trading, options, futures, whatever fits your style.
Key Takeaways
- Webull's customized layout feature lets you build your own trading dashboard from scratch using widgets.
- Start from a blank layout for full control, or use a pre-built template if you want a head start.
- The adaptive layout option auto-fills your screen with widgets — turn it off if you want manual control over sizing and placement.
- Group widgets together so they sync with each other (e.g., changing the ticker on your chart updates your quote widget at the same time).
- You can stack multiple widgets in the same area as tabs to keep your screen clean.
- Save your finished layout so you can pull it back up anytime.
Step 1: Open the Customized Layout Section
On the Webull desktop platform, head to the Custom tab on the left-hand side. If you're brand new, you'll likely just see a "Choose Layout" option with a bunch of pre-built layouts to pick from. If you've used Webull for a while, you'll see your existing layouts here too.
For this walkthrough, click on the Blank Layout option. There's also an Adaptive toggle next to it — adaptive means Webull will automatically fill your entire window with whatever widget you add. I'd recommend turning that off for now so you have manual control over how everything is sized and placed. You can always toggle it back on later.
Click the plus icon to create the new blank layout, and you'll be dropped into an empty workspace.
Step 2: Add Your First Widget
When you land on a new blank layout, Webull will usually pop the widgets panel open in the top right. If it doesn't, look for the small toolbox icon in the top-right corner of the screen — not the plus sign (that creates a new layout), not the import or save buttons, but the toolbox at the end. Click that and the widgets panel opens.
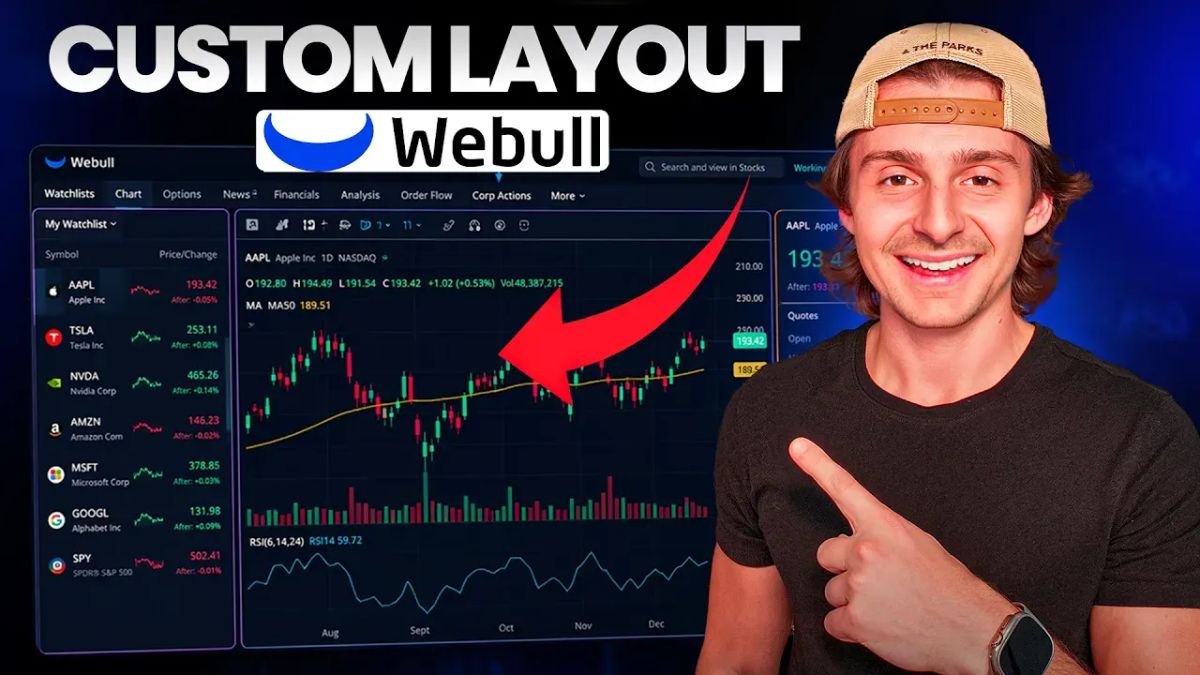
The most important widget for almost any layout is the chart. Click on it and it'll drop onto your workspace. From there, you can drag the corners to resize it however you want. I like to make the chart the centerpiece of the layout, since most of my analysis happens there.
Step 3: Add a Quotes Widget Above the Chart
Above the chart, I like to add the quotes widget so I can see key info on whatever ticker I'm looking at — NASDAQ Level 1 data, fractional share availability, overnight session hours, marginability, shortability, and so on. It's all useful context that doesn't quite fit on the chart itself.
Drag the quotes widget into place above the chart and resize it to a thin horizontal strip. Now you have your chart with a clean info bar above it.
Step 4: Group Your Widgets So They Sync
Here's where most beginners get tripped up. By default, every widget operates independently. So if you change the ticker on your chart from SPY to QQQ, your quotes widget will still show SPY. That's not what you want.
To fix this, click the small "Set as Group" icon in the top-right corner of each widget you want to sync. Set them all to the same group number — Group 1, for example. Now whenever you change the ticker on one widget, every other widget in that group updates at the same time.
This is the single most important customization for a clean workflow. Group your chart, your quotes widget, your watchlist, and any other widget that should follow the same ticker.
Step 5: Stack Widgets as Tabs
One of the most underrated features in the Webull custom layout is the ability to stack multiple widgets into the same area as tabs. For example, let's say you want quick access to the option chain and option statistics, but you don't need to see them at the same time as your chart.
Instead of giving them their own dedicated space on the screen, drag the new widget into your existing chart widget. As you drag it toward the top bar of the chart, you'll see the area highlight — drop it there and it becomes a tab. Now you can toggle between the chart, the option chain, and option statistics from the same area without taking up more screen real estate.
This is huge for keeping your layout clean. Anything you don't need to see simultaneously can be tabbed together.
Step 6: Add Watchlist, Market Overview, and Other Widgets
From here, it's about filling in the rest of the layout based on what you actually use. Here are the widgets I added for my charting layout:
- Watchlist — under the General section. Set this to the same group as your chart and quotes so clicking a stock in your watchlist instantly pulls it up on the chart.
- News — useful for keeping an eye on market headlines and press releases without leaving the layout.
- Heat Map — gives you a quick visual of how the overall market is performing on the day.
- Index Chart — shows the S&P, Dow, and NASDAQ all in one widget so you can see how the major indices are trading at a glance.
- Clock — sounds basic, but having a clock right on your layout is genuinely useful when you're in the zone and lose track of time.
- Order Entry (Classic Trade) — for when you actually want to place a trade. Classic Trade is simple and clean. If you're scalping or day trading, swap this out for the Turbo Trader widget instead, which lets you set quick buy/sell quantities and fire off trades faster.
Step 7: Customize Your Chart Settings
Don't forget to customize the chart itself. Click the gear icon in the top corner of the chart widget to open chart settings. There's a ton of options in here — display elements, news markers, corporate actions, gridlines, contracts, color themes, and more.
I usually turn off the gridlines (personal preference — I find them distracting), hide anything I don't need on the chart, and set up my color scheme so it's clean and easy to read. Take a few minutes here to dial it in. It makes a real difference when you're staring at this thing for hours.
Step 8: Save Your Layout
Once everything is exactly how you want it, save it. Go to the top-right corner and click "Save as a Customized Layout". Give it a name — something like "Charting 1" or "Day Trading Setup" — and hit save.
Your saved layouts will now show up under the Custom tab anytime you want to pull them back up. You can have multiple saved layouts for different use cases — one for charting, one for active trading, one for options, and so on — and switch between them with a click.
One small annoyance: when you save over an existing layout, you'll need to rename the active tab manually. Hopefully Webull cleans this up in a future update, but it's a minor inconvenience.
FAQ
Is the customized layout feature free on Webull?
Yes. Custom layouts are part of the standard Webull desktop platform and don't cost anything extra.
Do I need a desktop to use custom layouts?
Yes, this feature is on the Webull desktop platform. Mobile and web have different interfaces and don't offer the same level of customization.
Can I have multiple custom layouts saved at the same time?
Absolutely. You can save as many layouts as you want and switch between them depending on what you're doing — charting, day trading, options, futures, or anything else.
What's the difference between adaptive and non-adaptive layouts?
Adaptive automatically fills your entire window with whatever widget you add. Non-adaptive lets you manually control the size and placement of each widget. I prefer non-adaptive for the control it gives you.
How do I make my chart and watchlist sync to the same ticker?
Click the "Set as Group" icon in the top-right of each widget and assign them to the same group number. Once they're grouped, changing the ticker on one will update all the others in the group.
Can I tab multiple widgets together?
Yes. Drag a widget toward the top bar of an existing widget — when you see the area highlight, drop it there and it becomes a tab. You can stack as many widgets as you want this way.
What's the best widget for placing trades?
Depends on your style. Classic Trade is great for slower, more deliberate trading. Turbo Trader is better if you're scalping or day trading and need to fire off orders quickly with pre-set quantities.
Final Thoughts
Building a custom layout on Webull is one of those things that takes 15 minutes upfront but saves you time on every single session afterward. Once you have your widgets where you want them, your groups synced, and your chart settings dialed in, the platform genuinely starts working for you instead of the other way around.